Diagnosing problems with your oil pressure sensor wiring can feel confusing, especially if you’re not a trained mechanic. But you don’t need advanced skills to figure out what’s wrong. With a little patience, careful steps, and the right tools, you can find the cause of oil pressure sensor issues and avoid expensive repairs. This guide will give you clear, simple steps to diagnose your oil pressure sensor wiring, spot common mistakes, and understand what each result means. By the end, you’ll know how to test, trace, and fix wiring problems confidently—even if you’re new to car repairs.
Understanding Oil Pressure Sensor Wiring
Before you start testing, it helps to know what the oil pressure sensor does and how its wiring works. In most cars, the oil pressure sensor is a small part screwed into the engine block. Its job is to measure oil pressure and send a signal to your car’s computer or the dashboard gauge.
The wiring usually includes:
- Signal wire: Sends the pressure reading to the gauge or ECU.
- Power wire: Supplies voltage to the sensor.
- Ground wire: Provides a return path for the current.
Some cars use a single wire, while others have two or three. Faulty wiring can cause wrong readings, warning lights, or even engine damage if left unchecked.
Why Wiring Problems Matter
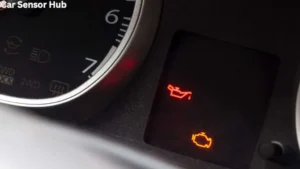
A broken wire, corroded connector, or poor ground can make your sensor work incorrectly. This might show as:
- The oil warning light stays on
- The oil pressure gauge reads zero or maximum all the time
- Intermittent warnings, especially when driving over bumps
Ignoring these signs can lead to a damaged engine if there’s actually a real oil pressure problem. That’s why checking the wiring is just as important as checking the sensor itself.
Tools And Materials You’ll Need
Testing sensor wiring is easier when you have the right tools. Here’s what you should gather before you begin:
- Digital multimeter (with continuity and voltage settings)
- Basic hand tools (screwdrivers, socket set)
- Wire brush or contact cleaner for cleaning connections
- Service manual or wiring diagram for your specific car
- Test light (optional, for quick checks)
- Replacement wire or connectors (in case you find damage)
- Protective gloves and safety glasses
If you’re not sure where to find your car’s wiring diagram, many manufacturers provide them online or in repair manuals.
Visual Inspection: The First Step
Before you use any tools, start with a careful look at the sensor and its wiring. Many wiring problems are visible if you know what to look for.
- Locate the oil pressure sensor. Usually, it’s near the oil filter or on the side of the engine block.
- Check the wiring harness. Look for:
- Cracked, frayed, or melted wires
- Loose or disconnected plugs
- Oil leaks around the sensor
- Corrosion or greenish deposits on connectors
Even a small amount of oil on the connector can cause problems. Clean any dirty connectors with contact cleaner and a brush. Never force a connector—if it feels stuck, use a gentle twisting motion.
Common Visual Clues
- Broken insulation: Wires missing their plastic cover can short to metal parts.
- Burn marks: Signs of overheating, often near the engine.
- Water or oil in connectors: Causes corrosion and poor contact.
If you spot damage, note the exact location for repair. Sometimes, just fixing a bad connector solves the whole problem.
Reading The Wiring Diagram
A wiring diagram is like a map for your car’s electrical system. It shows how the oil pressure sensor connects to the rest of the car. If you’re new to reading diagrams, focus on these basics:
- Wire color codes: Helps you match wires to the sensor and the dashboard.
- Connector pin numbers: Each wire usually goes into a numbered slot.
- ECU or gauge location: Shows where the other end of the wires go.
Take a photo or print the diagram for easy reference. This makes tracing wires much simpler, especially if the harness is hard to reach.

Credit: www.youtube.com
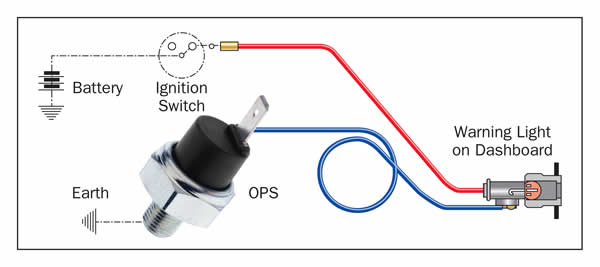
Testing For Power And Ground
If the wiring looks okay, the next step is to check if the sensor is getting the right voltage and ground. A multimeter is essential here. Here’s how to do it:
Checking For Power
- Turn your car’s ignition to the ON position (engine off).
- Set your multimeter to DC volts.
- Connect the black lead to a good ground (bare metal).
- Probe the power wire at the sensor connector with the red lead.
You should see a voltage reading (usually around 5V for most sensors, sometimes 12V). If there’s no voltage, the wire may be broken, or there’s a blown fuse.
Checking The Ground
- Keep the black lead on the sensor ground wire.
- Connect the red lead to the positive battery terminal.
You should see battery voltage (about 12V). If the voltage is much lower, the ground connection is weak or corroded.
If either test fails, trace the wire back to find breaks, corrosion, or loose connections.
Continuity Testing: Finding Broken Wires
If you suspect a broken wire, use the continuity setting on your multimeter. This test checks if there’s a complete path for electricity.
- Disconnect both ends of the wire you want to test.
- Set the meter to continuity or resistance (ohms).
- Touch one probe to each end of the wire.
A good wire will beep (continuity) or show a very low resistance (close to 0 ohms). If the meter stays silent or shows “OL” (open loop), the wire is broken.
Example Table: Expected Continuity Results
| Test Point | Expected Result | Possible Issue if Not Met |
|---|---|---|
| Sensor Power to ECU | Beep / 0-1 ohm | Broken wire or connector |
| Sensor Ground to Chassis | Beep / 0-1 ohm | Bad ground or corrosion |
| Sensor Signal to Gauge | Beep / 0-1 ohm | Open circuit in wire |
If you find a broken wire, look for the cause—sharp bends, rubbing on metal, or heat can damage wires over time.
Credit: premierautotrade.com.au
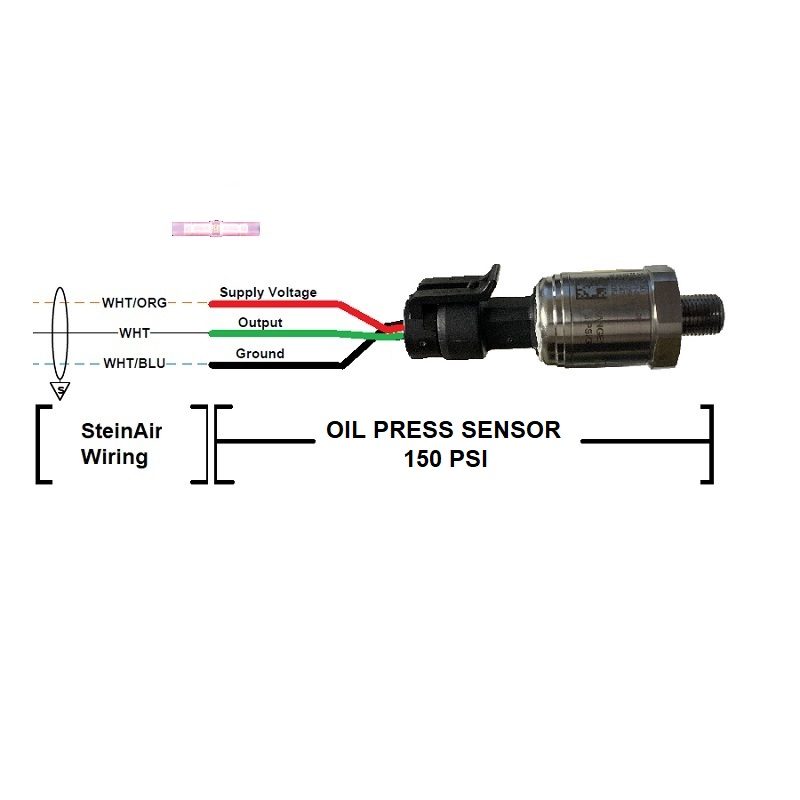
Sensor Signal Testing
The sensor’s signal wire carries information about oil pressure to the dashboard or computer. Testing this wire can show if the sensor’s signal is reaching its destination.
- With the ignition ON, connect your meter’s black lead to ground.
- Probe the signal wire at the sensor connector.
- Watch the voltage reading.
For most cars, you’ll see a signal between 0. 5V (low pressure) and 4. 5V (high pressure). If the reading never changes or is stuck at one value, there may be a wiring fault.
Live Data Scan
If you have access to a scan tool or OBD2 reader, you can check the oil pressure reading in real time. Compare the live data with your meter reading. If they don’t match, the signal wire may have high resistance, interference, or a poor connection.
Example Table: Signal Voltage And Oil Pressure
| Oil Pressure (psi) | Expected Signal Voltage | What It Means |
|---|---|---|
| 0-5 | 0.5-1V | Low oil pressure / engine off |
| 20-40 | 2-3V | Normal idle pressure |
| 60+ | 4-4.5V | High pressure / revving |
If your readings fall outside these ranges, check the wiring before replacing the sensor.
Common Problems And How To Fix Them
When diagnosing oil pressure sensor wiring, some problems happen more often than others. Here’s how to spot and repair them.
1. Corroded Or Loose Connectors
Connectors near the engine are exposed to heat, oil, and water. Corrosion can block the signal.
- Remove the connector and inspect for green or white deposits.
- Clean with electrical contact cleaner.
- Tighten loose pins gently with a pick or small screwdriver.
2. Damaged Wires
Wires can break inside the insulation, especially near bends.
- Gently tug each wire—if it stretches or feels “soft,” it’s probably broken inside.
- Repair with solder and heat-shrink tubing, or use a quality crimp connector.
3. Short Circuits
If a wire touches bare metal, it can short to ground.
- Look for melted or burned insulation.
- Use your meter to check for continuity between the signal wire and ground (should show “OL” or no beep).
- Replace or reroute wires as needed.
4. Sensor Itself Is Faulty
Sometimes, the sensor fails and causes strange readings. Always test the wiring first—many sensors are replaced when the real problem is a bad wire.
5. Poor Grounding
A weak ground can cause erratic signals.
- Clean the ground point on the engine or chassis.
- Use a wire brush and tighten the bolt.
Advanced Diagnostics
If you’ve checked everything above and still have trouble, here are two advanced steps.
Back-probing The Connector
Sometimes, a wire can look fine but have high resistance due to corrosion inside the connector. Use a back-probe pin to test voltage with the connector plugged in. Compare readings between the sensor side and the harness side.
Using A Test Light
A test light can help if you don’t have a multimeter. Connect the clip to ground and touch the probe to the power wire. The light should glow if voltage is present. This won’t measure exact voltage, but it’s a quick check for broken wires.
Example Table: Multimeter Vs Test Light
| Test Tool | What It Checks | Accuracy | Best Use |
|---|---|---|---|
| Multimeter | Voltage, continuity, resistance | High | Detailed diagnosis |
| Test Light | Presence of voltage | Low | Quick checks |
Non-obvious Insights Most Beginners Miss
- Heat cycling causes hidden failures. Wires near the engine heat up and cool down thousands of times. This makes the copper inside brittle. Even if insulation looks fine, the wire inside may have “micro-cracks.” These can cause random sensor problems that only happen when the engine is hot or cold.
- Oil leaks can travel inside the wire. If oil gets into the connector, it can move along the wire under the insulation (a process called “capillary action”). This causes hidden corrosion many inches away from the sensor. If you see oil in the connector, peel back insulation further to check for hidden damage.
- Multiple sensors may share a ground. Some cars run several sensors on the same ground wire. If another sensor fails, it can affect your oil pressure sensor reading. Always check if the ground is used by other circuits.
Mistakes To Avoid When Diagnosing
- Don’t skip the basics. Many people replace sensors without checking the wiring.
- Never poke test leads through wire insulation unless you plan to repair the hole. This lets moisture in and causes future problems.
- Don’t ignore intermittent warnings. If your oil light flickers, test the wiring even if it seems fine at first.
- Don’t guess wire colors. Always check the wiring diagram for your car. Manufacturers change colors between years and models.
When To Seek Professional Help
Some wiring faults are hard to find, especially if they’re inside the main harness or hidden under the dashboard. If you’ve tested all wires, cleaned connectors, and still have problems, it’s wise to see a qualified mechanic. They have advanced tools like oscilloscopes and can test the entire system quickly.
If your car is under warranty, avoid cutting or splicing wires—this can void coverage. Document your tests and share them with your mechanic. It saves time and shows you’ve done your homework.
Preventing Future Wiring Problems
Good repairs help now, but prevention saves you trouble later. Here’s how to avoid future wiring issues:
- Keep connectors clean and dry. Use dielectric grease on contacts to repel water.
- Secure loose wires with clips or zip ties away from hot engine parts.
- Check wiring during oil changes. A quick look can catch problems early.
- Avoid high-pressure washing near electrical parts.
Many mechanics overlook these steps, but they extend the life of your sensor and wiring.
Real-world Example
Maria owns a 2012 Toyota Corolla. Her oil light turned on, but the engine sounded normal. The sensor and wiring were easy to reach. She found oil in the connector and a broken ground wire. After cleaning the connector and repairing the ground, the warning light disappeared.
She saved $150 by fixing the wiring instead of replacing the sensor.
This example shows how a simple wiring check can prevent unnecessary parts replacement and repair bills.
Extra Tips For Accurate Diagnosis
- Take photos before disconnecting anything. This helps you reconnect wires correctly.
- Label connectors if you remove more than one at a time.
- Test with the engine cold and hot. Some wiring faults only appear at certain temperatures.
- Keep a log of your tests and results. This helps if you need further help later.
Where To Learn More
If you want to dive deeper, many automaker websites and repair manuals offer detailed diagrams and troubleshooting guides. For more on automotive sensors, visit the Wikipedia Oil Pressure Sensor page.
Credit: www.steinair.com
FAQs Of How to Diagnose Oil Pressure Sensor Wiring
What Are The Signs Of A Bad Oil Pressure Sensor Wire?
The most common signs are the oil warning light staying on, a gauge that doesn’t move, or warnings that come and go. Sometimes, you may notice other electrical problems if the ground is shared with other sensors.
Can I Drive With A Faulty Oil Pressure Sensor Wire?
It’s risky. If the warning is false, you might ignore a real oil pressure problem. If the warning is real and you keep driving, you could damage your engine. It’s best to fix the wiring as soon as possible.
How Much Does It Cost To Repair Oil Pressure Sensor Wiring?
Simple repairs—like cleaning a connector or splicing a short wire—can cost nothing if you do it yourself. Shops may charge $50–$150 depending on labor and parts. Wiring harness replacement is more expensive.
Do All Cars Use The Same Oil Pressure Sensor Wiring?
No. Some use one wire, others use two or three. The wire colors, connector shape, and signal type can vary by brand and model. Always check your vehicle’s wiring diagram before testing.
How Often Should I Check My Oil Pressure Sensor Wiring?
It’s smart to check during regular maintenance, like oil changes, or if you see warning lights. In older cars or after engine work, inspect the wiring more often to catch problems early.
With careful testing and a methodical approach, diagnosing oil pressure sensor wiring is within reach for most car owners. Clear steps and a few reliable tools are your best friends—no guesswork required.
Disclosure: As an Amazon Associate, I may earn from qualifying purchases at no extra cost to you. Amazon and the Amazon logo are trademarks of Amazon.com, Inc, or its affiliates.
- Amazon, Amazon Prime, the Amazon logo and Amazon Prime logo are trademarks of Amazon. com, Inc. or its affiliates.

I am Sadman, the founder of CarSensorHub.com, where I share my passion for cars and technology. I specialize in writing detailed reviews and helpful guides on car gadgets, accessories, safety tools and many more. My mission is to help car owners discover the best products and tips to improve their driving experience and stay safe on the road.