Checking the actual oil pressure in your engine is one of those tasks that can seem simple but quickly gets complicated, especially if your oil pressure sensor fails or gives strange readings. Many car owners and even mechanics rely entirely on dashboard sensors, but if you want to know your engine’s true oil pressure, you need to go beyond electronics.
This article will walk you through the complete process of checking real oil pressure without using the vehicle’s built-in sensor. Whether your dashboard warning light is flickering, or you’re troubleshooting a more serious problem, understanding how to do this test can save your engine and your wallet.
Many guides online give a brief overview, but they often skip safety tips, misunderstand common mistakes, or fail to explain why oil pressure matters so much. Here, you’ll get clear steps, practical advice, and real-world insights plus answers to questions most beginners never think to ask.
Why Actual Oil Pressure Matters
Your engine relies on oil pressure to keep moving parts lubricated. If pressure drops too low, metal surfaces start rubbing directly, causing heat and rapid wear. This can lead to engine damage in minutes. High oil pressure, on the other hand, can burst seals or create leaks. That’s why mechanics and serious DIYers always want to know the true, measured oil pressure—not just what a dashboard sensor says.
It’s important to remember that sensors can fail, get clogged, or provide false readings. For example, a typical oil pressure sensor only has a range of 0-80 psi, and if it gets stuck, you might see a constant “normal” reading even when the real pressure is dangerously low.
When Should You Check Oil Pressure Manually?
Checking oil pressure manually isn’t something you need to do every day. But there are times when it’s essential:
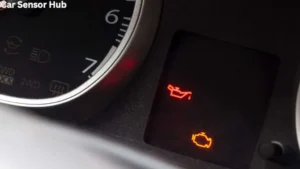
- The oil pressure warning light flickers or stays on.
- You hear engine knocking, ticking, or unusual noises.
- After rebuilding an engine or installing a new oil pump.
- When buying a used car with unclear maintenance history.
- If you suspect an oil leak or a faulty sensor.
Manual testing gives you a direct measurement, so you know if your engine is safe to run or needs urgent attention.
Tools And Equipment Needed
You can’t check oil pressure accurately without the right tools. Here’s what you need:
- Mechanical oil pressure gauge kit (includes adapters and hoses)
- Wrenches (usually open-end or socket set)
- Shop rags (for cleaning up oil)
- Safety gloves and eye protection
- Drain pan (to catch any spilled oil)
- Flashlight (helps when working in tight engine bays)
- Thread sealant tape (for leak-free connections)
A typical mechanical oil pressure gauge kit costs between $20 and $50. Make sure the gauge can read at least 0-100 psi, as most car engines run between 20 and 70 psi under normal conditions.
Understanding The Oil Pressure Testing Process
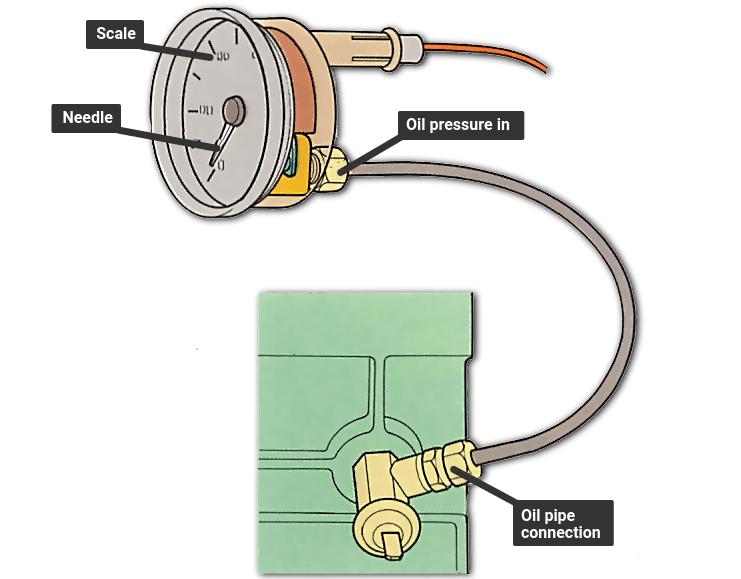
Before you start, it’s important to know where you’ll be connecting the gauge. Most vehicles have an oil pressure sensor port on the engine block. This is usually near the oil filter or on the side of the engine. You’ll temporarily remove the sensor and screw in your mechanical gauge.
Here’s a simple overview:
- Locate the oil pressure sensor.
- Remove the sensor.
- Attach the mechanical gauge in its place.
- Start the engine and read the gauge.
- Compare readings with the manufacturer’s specifications.
The whole process usually takes 30-45 minutes, including setup and cleanup.
Step-by-step Guide: Checking Actual Oil Pressure Without A Sensor
Let’s break down the procedure in detail, so even if you’re a beginner, you can do this confidently.
Step 1: Prepare The Engine And Work Area
Make sure the engine is off and has cooled down. Hot oil can burn your skin, and hot metal parts are dangerous. Park the car on a level surface, engage the parking brake, and open the hood. Gather all your tools within easy reach.
Step 2: Locate The Oil Pressure Sensor
The location varies by car model, but common spots are:
- Near the oil filter
- On the side of the engine block
- Close to the cylinder head
Check your vehicle’s manual or search online for your specific engine. Use a flashlight to confirm you’ve found the correct sensor.
Step 3: Remove The Oil Pressure Sensor
Carefully disconnect the sensor’s electrical connector. Use the correct wrench to unscrew the sensor. Some oil may drip out, so place a drain pan underneath. Clean the area with a rag so dirt doesn’t fall into the port.
Step 4: Attach The Mechanical Oil Pressure Gauge
Select the right adapter from your gauge kit. Wrap the threads with thread sealant tape to prevent leaks. Screw the adapter into the sensor port by hand, then tighten gently with a wrench. Attach the gauge’s hose and make sure all connections are snug.
Step 5: Start The Engine And Monitor The Gauge
Have an assistant start the engine, or do it yourself if you can see the gauge from the driver’s seat. Watch the gauge as the engine idles. It should quickly rise to a value between 20-40 psi at idle, depending on the engine.
Rev the engine gently to around 2,500 rpm. The pressure should increase, usually to 45-70 psi. If the reading is much lower or higher, stop the engine and investigate.
Tip: If you see zero pressure, shut off the engine immediately. Running an engine with no oil pressure can destroy it in seconds.
Step 6: Compare The Readings
Look up the manufacturer’s specifications for your vehicle. These are often listed in the service manual or online. For example, a typical spec might be:
- 20 psi minimum at idle when hot
- 45-70 psi at 2,500 rpm
If your readings are within spec, your oil pump and engine bearings are likely healthy. If they are low, you may have worn bearings, a weak oil pump, or a clogged oil passage.
Step 7: Remove The Gauge And Reinstall The Sensor
Turn off the engine and let it cool for a few minutes. Carefully remove the gauge and adapter. Wipe away any spilled oil and inspect the sensor port for dirt. Screw the oil pressure sensor back in, reconnect the electrical plug, and clean up your tools.
Step 8: Test For Leaks And Check Dashboard
Start the engine again and check for oil leaks around the sensor. Confirm that the dashboard oil pressure light goes out. If everything looks good, you’re done.
Comparing Mechanical Gauge Vs. Electronic Sensor
It’s helpful to see how a mechanical oil pressure gauge stacks up against the built-in electronic sensor.
| Feature | Mechanical Gauge | Electronic Sensor |
|---|---|---|
| Accuracy | High (direct reading) | Can drift/fail |
| Reliability | Very reliable | Prone to clogging/failure |
| Installation | Temporary/manual | Permanent, factory installed |
| Cost | Low (one-time tool) | More expensive to replace |
| Live Monitoring | No (test only) | Yes (dashboard) |
Non-obvious insight: Even a brand-new sensor can give incorrect readings if there’s sludge or debris in the engine oil.
Common Mistakes To Avoid
Many first-time testers make errors that can cause confusion or even engine damage. Here are some important mistakes to avoid:
- Testing with a hot engine: You risk burns and oil sprays. Always let the engine cool.
- Not using thread sealant: This can cause leaks and inaccurate readings.
- Forgetting to reinstall the sensor: Double-check before starting the engine.
- Not comparing to correct specs: Always use your engine’s actual requirements, not generic numbers.
- Over-tightening connections: This can strip threads or crack the sensor port.
Pro tip: Take photos of each step. This helps if you forget how things fit together or need to share info with a mechanic.
What Your Oil Pressure Results Mean
Understanding the numbers is just as important as measuring them. Here’s a simplified chart of typical oil pressure readings and what they might indicate:
| Oil Pressure (psi) | Engine Condition | Possible Causes |
|---|---|---|
| 0-10 (idle) | Dangerously low | Worn bearings, failed oil pump, clogged pickup |
| 20-30 (idle) | Normal | Healthy engine |
| 45-70 (2500 rpm) | Normal | Healthy engine |
| 75+ | Too high | Blocked oil passage, stuck pressure relief valve |
Non-obvious insight: If your pressure is low only when the engine is hot, but fine when cold, this often points to worn bearings—not a failing oil pump.

Credit: www.wikihow.com
Extra Tips For Accurate Testing
- Use the right oil: Old or thin oil can cause falsely low readings. Change oil if it’s overdue.
- Test with a warm engine: Oil pressure drops as oil heats up. Always check at normal running temperature.
- Check multiple RPMs: Don’t just test at idle. Rev the engine to see how pressure changes.
- Listen for noises: A healthy engine is quiet. Knocking or ticking suggests low pressure is already causing damage.
- Check oil level: Low oil can cause pressure drop. Top up if needed before testing.
Safety Considerations
Working with engines and oil involves risks. Here’s how to stay safe:
- Always wear gloves and eye protection
- Let the engine cool before touching metal parts
- Watch for moving belts and fans when testing with the engine running
- Clean up spilled oil right away—it’s slippery and a fire risk
- Dispose of rags and used oil safely
When To Call A Professional
Manual oil pressure testing is a great DIY skill, but sometimes you need an expert. Call a professional mechanic if:
- The sensor port is hard to access or blocked
- You get confusing or extreme readings
- You hear loud engine noises
- You’re not confident in your results
A good mechanic has specialty tools and experience with tricky engines. Remember, it’s better to ask for help than risk serious engine damage.
How To Choose A Quality Mechanical Oil Pressure Gauge
Not all gauges are equal. Here are things to consider when buying:
- Accuracy: Look for gauges calibrated to ±2 psi or better.
- Pressure range: Should read at least 0-100 psi.
- Adapters included: Multiple thread sizes for different engines.
- Build quality: Brass fittings and reinforced hoses last longer.
- Easy-to-read face: Large numbers, color zones for safe/unsafe.
Avoid extremely cheap kits—they often leak or break. Good brands include Actron, OTC, and Lisle.

Credit: www.ebay.com
What If You Don’t Have A Mechanical Gauge?
If you need to check oil pressure right away and don’t have a gauge, here’s what you can try:
- Borrow a gauge from an auto parts store. Many offer tool loans.
- Visit a mechanic for a quick test—some shops offer this for free or a small fee.
- Check for physical symptoms: Look for oil leaks, listen for ticking, or observe if the oil light comes on at idle.
Remember, guessing is risky. A proper gauge test is always best.
Real-world Example: Testing A Honda Civic
Let’s look at a typical test on a 2010 Honda Civic with a suspected oil pressure issue. The owner noticed the oil light flickering at idle after a long drive.
- The sensor was located near the oil filter.
- After removing the sensor and screwing in the gauge, the engine was started.
- At idle, the pressure read 16 psi (spec is 10 psi minimum).
- At 2,500 rpm, the pressure was 55 psi (spec is 50-70 psi).
- Result: The engine is safe, but the oil is old and thin. An oil change restored idle pressure to 22 psi.
Lesson: Always check the manufacturer’s specs and consider oil condition before worrying about low readings.
Credit: www.howacarworks.com
Troubleshooting Unusual Readings
If your gauge shows strange results, here’s what to do:
- Low pressure at all RPMs: Check oil level, oil filter, and look for leaks. Test again with fresh oil.
- High pressure: Suspect a blocked oil passage or stuck relief valve.
- Zero pressure but normal noise: Gauge may not be seated properly, or the oil passage is blocked.
- Pressure fluctuates wildly: Air bubbles in the line or a loose connection.
Most issues are caused by worn-out oil, clogged filters, or simple mistakes during setup.
Environmental Impact Of Oil Leaks
Spilled oil is toxic to the environment. A single quart can pollute thousands of gallons of water. Always use a drain pan, clean up spills, and dispose of oil and rags at a recycling center. Never pour oil down drains or onto the ground.
More Resources
For deeper technical details or to see manufacturer specs, check your car’s service manual or a trusted online database like Wikipedia.
FAQs About How To Check Actual Oil Pressure Without Sensor
How Often Should I Check Actual Oil Pressure?
You only need to check actual oil pressure manually if you suspect a problem, such as a warning light, strange noises, or after engine repairs. For most drivers, once every few years or when troubleshooting is enough.
Can I Drive With A Faulty Oil Pressure Sensor?
It’s risky. A faulty sensor means you can’t trust your dashboard warning. If you’re sure oil pressure is normal from a manual test, you can drive short-term, but replace the sensor as soon as possible.
What Oil Pressure Is Too Low For Safe Driving?
Most engines need at least 20 psi at idle and 45-70 psi at higher RPMs. Below these values, you risk damaging engine bearings. Always check your vehicle’s manual for exact numbers.
Is It Possible To Test Oil Pressure Without Removing The Sensor?
No, you need access to the sensor port. Some advanced systems have test ports, but in most cases, you must remove the sensor to install the mechanical gauge.
Does Oil Brand Or Viscosity Affect Pressure Readings?
Yes. Thicker oils (higher viscosity) give higher pressure readings, especially when cold. Old or worn-out oil can lower pressure. Always use the recommended oil for your engine.
Checking actual oil pressure without a sensor is a powerful way to protect your engine and make sure your car stays reliable. With a little care, the right tools, and the tips above, you can be confident in your results and avoid expensive mistakes.
Disclosure: As an Amazon Associate, I may earn from qualifying purchases at no extra cost to you. Amazon and the Amazon logo are trademarks of Amazon.com, Inc, or its affiliates.
- Amazon, Amazon Prime, the Amazon logo and Amazon Prime logo are trademarks of Amazon. com, Inc. or its affiliates.

I am Sadman, the founder of CarSensorHub.com, where I share my passion for cars and technology. I specialize in writing detailed reviews and helpful guides on car gadgets, accessories, safety tools and many more. My mission is to help car owners discover the best products and tips to improve their driving experience and stay safe on the road.