Testing the oil pressure sensor in your vehicle is a smart way to keep your engine healthy. This sensor tells you if your car’s oil pressure is too low or too high. If it fails, your engine could be damaged before you even notice. Luckily, you don’t need advanced tools to check it—a basic multimeter can do the job. If you’re new to car maintenance, don’t worry. With the right steps, even beginners can test an oil pressure sensor confidently and safely.
This guide will walk you through everything you need to know, from understanding the sensor’s function to interpreting test results. You’ll get clear steps, practical tips, safety advice, and answers to common questions. By the end, you’ll know how to test your oil pressure sensor with a multimeter, and what to do if something’s wrong.
What Is An Oil Pressure Sensor?
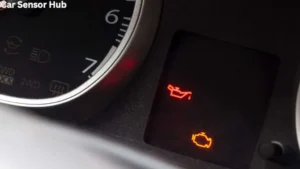
The oil pressure sensor (sometimes called an oil pressure switch or sending unit) is a small device in your engine. Its job is simple but critical: it measures the oil pressure and sends a signal to your car’s dashboard or computer. If the pressure is too low, a warning light or message appears. This warning helps you avoid engine damage, since oil pressure keeps your engine’s moving parts lubricated.
There are two main types of oil pressure sensors:
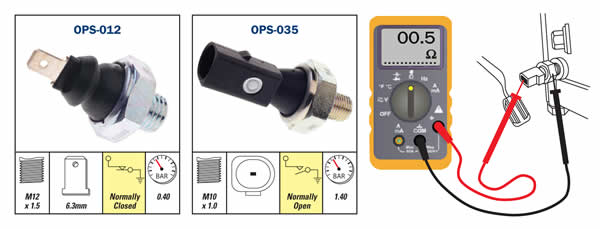
- Switch-type sensors – These are simple on/off switches. They trigger the oil warning light if pressure drops below a certain level.
- Variable-resistance sensors – These send a range of signals based on pressure, allowing for a gauge reading instead of just a light.
Most modern cars use variable-resistance sensors, but both types are still common.
Why Test An Oil Pressure Sensor?
Many people ignore the oil pressure warning, thinking it’s a faulty sensor. Sometimes that’s true—but you shouldn’t assume. If your sensor fails, you might not know if your oil pressure is dangerously low, which can quickly destroy an engine.
Testing the sensor is important if:
- The oil warning light comes on but you have enough oil.
- The oil gauge shows strange readings (very high or zero).
- The warning light flickers or behaves inconsistently.
- You’ve recently replaced engine parts or changed oil.
A faulty sensor is one of the most common reasons for false oil pressure warnings, but electrical issues or wiring damage can also cause problems.
How Does A Multimeter Help?
A multimeter is a small, handheld device that measures voltage, resistance, and current. It’s essential for diagnosing electrical parts in your car. When testing the oil pressure sensor, you’ll use the multimeter to check for:
- Continuity (does the sensor complete the circuit?)
- Resistance (does the sensor’s resistance change with pressure?)
- Voltage (is the right signal reaching the sensor?)
By checking these, you can tell if the sensor is working or if there’s a wiring issue.
Tools And Materials You Need
Before you start, gather all the tools you’ll need. Having everything ready will save you time and reduce mistakes.
- Digital multimeter (with continuity and resistance modes)
- Basic hand tools (like wrenches or sockets to remove the sensor, if needed)
- Work gloves (to protect your hands)
- Rags or paper towels (oil may spill)
- Vehicle service manual (for sensor location and specs)
- Safety glasses (to protect your eyes from oil)
- Replacement oil pressure sensor (if you find yours is bad)
- Jack and jack stands (if the sensor is hard to reach)
Most vehicles will let you access the sensor without removing many parts, but some require you to raise the car.
Locating The Oil Pressure Sensor
The oil pressure sensor is usually found near the oil filter or screwed into the engine block. It looks like a small, round or hex-shaped device with one or more wires connected to it.
Tips for locating it:
- Look for a round or hex-shaped unit, often with a single wire.
- Check your owner’s manual or a repair guide for the exact location.
- On some cars, it’s easier to see from underneath the engine.
If you’re unsure, search online for your car model’s sensor location or ask a mechanic.
Safety Precautions Before Testing
Testing electrical parts on a car is usually safe, but oil and electricity don’t mix well. Here’s how to protect yourself and your car:
- Turn off the engine and let it cool. Hot oil can burn you.
- Disconnect the negative battery cable to avoid electrical shorts.
- Wear gloves and safety glasses to protect from hot oil or debris.
- Clean around the sensor before removing it, so dirt doesn’t fall into the engine.
- Never crank the engine with the sensor removed, unless the manual tells you to.
Following these steps prevents injury and keeps your engine safe.
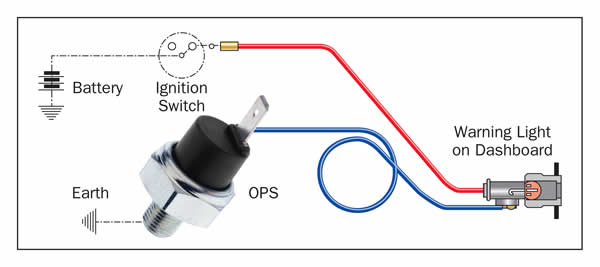
Credit: premierautotrade.com.au
Step-by-step: How To Test Oil Pressure Sensor With Multimeter
Let’s walk through the full process, from preparation to reading your results. This section will focus on both types of oil pressure sensors.
1. Identify Your Sensor Type
Before testing, you need to know if your car uses a simple switch-type sensor or a variable-resistance sensor.
- Switch-type: Has one wire; acts like an on/off switch.
- Variable-resistance: Has two or three wires; changes resistance with pressure.
If you’re not sure, check your service manual or look up your car model online.
2. Disconnect The Sensor
- Turn off the engine and let it cool.
- Disconnect the negative battery terminal.
- Unplug the wire connector from the oil pressure sensor.
Be gentle—the connectors can be fragile, especially on older cars.
3. Inspect The Sensor And Wiring
Before you test, inspect the sensor and wiring for obvious problems:
- Look for corrosion or broken wires.
- Check for oil leaks around the sensor.
- Make sure the connector is clean and dry.
Many times, bad connections are the real problem, not the sensor itself.
4. Test For Continuity (switch-type Sensor)
If your sensor is a switch type (one wire), you can test its continuity.
- Set your multimeter to the continuity or ohms (Ω) mode.
- Touch one probe to the sensor’s terminal and the other to the sensor’s metal body (ground).
- With the sensor removed, there should be continuity (a beep or low resistance) with no pressure applied.
- If you gently apply pressure (using a hand vacuum pump or by pressing inside the port), the circuit should open (no continuity).
If the readings don’t change with pressure, the sensor is faulty.
5. Test For Resistance (variable-resistance Sensor)
For variable-resistance sensors (two or three wires):
- Set your multimeter to the ohms (Ω) mode.
- Connect one probe to the sensor’s signal terminal and the other to ground.
- With the sensor removed, measure resistance with no pressure.
- Use a hand pump to apply pressure (if possible), or consult your manual for normal resistance values at different pressures.
Typical values:
- At zero pressure: High resistance (e.g., 100-300 ohms)
- At normal oil pressure: Lower resistance (e.g., 10-50 ohms)
If the resistance does not change when pressure is applied, the sensor is likely bad.
6. Test Voltage At Connector
Sometimes, the problem is with the wiring, not the sensor. Check the voltage at the sensor’s connector:
- Turn the ignition to “ON,” but don’t start the engine.
- Set your multimeter to DC volts.
- Touch the black probe to a good ground and the red probe to the connector’s signal terminal.
- You should see a voltage (often 5V or 12V, depending on your car).
If there’s no voltage, the problem may be in the wiring or the car’s computer.
7. Compare With Manufacturer Specs
Each car model has different normal values for resistance and voltage. Always compare your readings with the specs in your service manual.
Here’s a sample comparison of typical resistance values at different oil pressures:
| Oil Pressure (psi) | Expected Resistance (ohms) |
|---|---|
| 0 | 240-300 |
| 20 | 100-130 |
| 40 | 50-80 |
| 60 | 20-40 |
Note: Actual values depend on your car. Always check the manual.
8. Reinstall Or Replace The Sensor
- If the sensor passes all tests, clean it and reinstall.
- If it fails, install a new one and reconnect the wiring.
- Don’t overtighten—use a torque wrench if possible.
9. Test The System
- Reconnect the battery.
- Start the engine and watch the oil pressure light or gauge.
- Make sure the warning light goes off and readings are normal.
If you still have problems, check wiring or consult a mechanic.
Common Problems And Troubleshooting
Testing the sensor is just one part of solving oil pressure issues. Here are common problems and tips for each:
- Oil warning light stays on: Possible causes include a failed sensor, broken wire, or real low oil pressure. Double-check oil level and wiring.
- Oil gauge reads zero or max: Usually a bad sensor or wiring, but can also be a stuck gauge.
- Oil leaks around sensor: Replace the sensor or its seal.
- Sensor works out of engine, fails in engine: May be a sign of clogged oil passages or engine wear.
- No voltage at connector: Check for blown fuses, damaged wires, or a bad engine computer.
An easy trick: If you replace the sensor and the problem remains, the issue is probably elsewhere—often in wiring or the engine itself.
Understanding Your Multimeter Readings
Interpreting multimeter readings is not always simple for beginners. Here’s what the most common readings mean:
- Continuity (beep or zero): Circuit is closed—switch is working (for switch-type).
- No continuity (open): Circuit is broken—could be a bad sensor or open wiring.
- Stable resistance: Sensor is stuck or faulty (for variable-resistance).
- Changing resistance: Sensor responds to pressure—usually good.
- No voltage: Wiring or ECU issue.
Here’s a quick reference for what you might see:
| Test Condition | Expected Multimeter Result | Possible Issue |
|---|---|---|
| Switch-type, no pressure | Continuity (beep) | Normal |
| Switch-type, with pressure | No continuity | Normal |
| Variable, pressure change | Resistance changes | Normal |
| No voltage at connector | 0V | Wiring/ECU issue |
Practical Tips For Accurate Testing
Many beginners miss these small but important details:
- Always test with a cool engine. Hot oil can cause burns and may affect sensor readings.
- Keep the sensor clean. Dirt can cause bad connections or false readings.
- Use the right multimeter setting. Using volts instead of ohms (or vice versa) gives wrong results.
- Label wires before disconnecting. It’s easy to forget where each wire goes, especially on three-wire sensors.
- Don’t overtighten the sensor. This can damage threads or crack the engine block.
If you’re unsure, take photos before you disconnect anything. This makes it much easier to put things back together correctly.
Credit: premierautotrade.com.au
When To Replace The Oil Pressure Sensor
Sometimes, cleaning or tightening the sensor fixes the problem. But you should replace the sensor if:
- It fails continuity or resistance tests.
- The oil warning light stays on, even after resetting.
- The sensor is leaking oil.
- The wiring and oil level are fine, but readings are still wrong.
Sensors are usually inexpensive and easy to change. Skipping this repair can lead to much bigger engine problems later.
Common Mistakes To Avoid
Testing an oil pressure sensor is easy if you avoid these beginner mistakes:
- Testing with the engine running (unless the manual says so). This is dangerous and can give false results.
- Using the wrong multimeter setting. Always double-check before testing.
- Forgetting to reconnect the battery. Your car won’t start if the negative terminal is off.
- Not comparing readings with manufacturer specs. Each car is different—always use the right numbers.
- Ignoring wiring issues. Many “bad sensors” are actually caused by damaged wires or connectors.
If you’re new to car repairs, take your time and double-check your work.
How Oil Pressure Sensor Problems Affect Your Car
A bad oil pressure sensor doesn’t just make the warning light come on. It can lead to other issues:
- False alarms: Annoying warnings can make you ignore real problems.
- Engine damage: If you miss a real low-pressure warning, your engine could fail.
- Failed inspections: Some states won’t pass cars with warning lights on.
- Poor engine performance: Some modern cars reduce power if they “think” oil pressure is low.
That’s why regular testing and repair are so important.
How To Tell If The Problem Is The Sensor Or Real Oil Pressure
Sometimes, the oil pressure warning is real. Other times, it’s just a sensor issue. Here’s how to tell:
- Check oil level first. Low oil causes low pressure.
- Listen for engine noise. Knocking or ticking means real pressure is low.
- Test with a mechanical gauge. This tool screws into the sensor port for an accurate reading.
- Compare with multimeter tests. If the sensor passes, check for engine problems.
If you’re still unsure, have a professional mechanic check your car. Never risk engine damage by guessing.
Real-world Example
Let’s say you have a 2012 Ford Focus. The oil warning light stays on, even though you just changed the oil. Here’s how you’d test it:
- Locate the sensor near the oil filter.
- Disconnect the wire and check for corrosion.
- Set your multimeter to ohms. Touch one probe to the sensor terminal, the other to ground.
- With the engine off, resistance is 250 ohms (normal).
- Start the car (with sensor reconnected) and monitor the gauge. If the gauge stays at zero, repeat the test with a new sensor.
- If the problem remains, check the wiring and the car’s computer.
This step-by-step approach saves time and helps you avoid replacing parts that aren’t broken.
How Testing The Oil Pressure Sensor Saves Money
Checking your oil pressure sensor yourself can save money in several ways:
- Avoids unnecessary repairs. You won’t replace the sensor if it’s working.
- Prevents engine damage. Early detection keeps repair costs low.
- Saves on diagnostics. Mechanics charge $50-$100 just to check sensors.
- Extends engine life. Proper oil pressure means less wear.
If you do need a new sensor, most cost $15-$60 and take less than an hour to replace.

Credit: www.youtube.com
A Quick Comparison: Diy Vs. Professional Testing
Is it better to test yourself or visit a mechanic? Here’s a simple comparison:
| Aspect | DIY Testing | Professional Testing |
|---|---|---|
| Cost | Low (just a multimeter) | Higher (labor fees) |
| Time | 1-2 hours | 1 hour, plus waiting |
| Accuracy | Good (if you follow steps) | Very high |
| Learning Value | High | Low |
| Tools Needed | Basic | Advanced |
For most people, DIY testing is a great way to learn and save money. But if you’re unsure, a mechanic can give you peace of mind.
Additional Resources
If you want to learn more about oil pressure sensors, their function, and testing methods, check out this Oil Pressure Wikipedia page for in-depth technical information.
FAQs For Test Oil Pressure Sensor With Multimeter
What Does An Oil Pressure Sensor Actually Do?
The oil pressure sensor measures the oil pressure inside your engine and sends a signal to the dashboard or computer. If the pressure is too low or too high, it triggers a warning light or gauge. This helps protect your engine from damage.
Can I Drive With A Faulty Oil Pressure Sensor?
You can drive with a bad sensor, but it’s risky. You won’t know if your oil pressure drops, which can destroy your engine quickly. Always fix the sensor or check your oil level before driving far.
How Often Should I Test My Oil Pressure Sensor?
It’s smart to test the sensor if you see warning lights, after major engine work, or at least once every two years. Regular checks can catch problems before they cause engine damage.
What If My Multimeter Shows Zero Resistance?
Zero resistance means the sensor is shorted internally or stuck “on. ” This usually triggers the oil warning light. Replace the sensor if you get this reading with no oil pressure applied.
Do I Need A Special Multimeter?
No, any basic digital multimeter with voltage and resistance settings will work. You don’t need an expensive or advanced model. Just make sure it’s accurate and the probes are in good shape.
Testing your oil pressure sensor with a multimeter is a valuable skill for every car owner. With the right steps and a little patience, you can solve common oil pressure problems, save money, and keep your engine running smoothly for years to come.
Disclosure: As an Amazon Associate, I may earn from qualifying purchases at no extra cost to you. Amazon and the Amazon logo are trademarks of Amazon.com, Inc, or its affiliates.
- Amazon, Amazon Prime, the Amazon logo and Amazon Prime logo are trademarks of Amazon. com, Inc. or its affiliates.

I am Sadman, the founder of CarSensorHub.com, where I share my passion for cars and technology. I specialize in writing detailed reviews and helpful guides on car gadgets, accessories, safety tools and many more. My mission is to help car owners discover the best products and tips to improve their driving experience and stay safe on the road.