To install a Nissan Frontier tonneau cover, confirm the cover fits your truck’s model year, bed length, and Utili-Track configuration, then prepare the bed, install the supplied mounting hardware, position the cover, and check its alignment and latches. The exact procedure depends on whether you have a folding, roll-up, or retractable cover.
Use the installation manual for your cover’s exact part number. Frontier mounting kits differ, and instructions for one cover may not apply to another even on the same truck.
Check Fitment Before Starting
Read the fitment label on the box and compare it with your Frontier. Confirm:
- Model year: Do not assume a cover listed for a 2005–2021 Frontier also fits a 2022 or newer truck.
- Bed length: Match the actual bed configuration rather than relying on the cab style alone.
- Utili-Track compatibility: Check whether the kit supports your factory cargo tracks.
- Bedliner compatibility: Look for instructions covering a drop-in liner, spray-in liner, or bed rail caps.
Manufacturers publish separate Frontier installation sheets for different applications. For example, UnderCover provides distinct Select instructions for 2005–2021 Frontiers and 2022-and-newer Frontiers.
Does Utili-Track Need to Be Removed?
That depends on the cover. Some kits attach using brackets fitted into the factory tracks, while others require a different arrangement.
The UnderCover Triad Frontier instructions use slide nuts and brackets with Utili-Track. In contrast, the Retrax FRC-4000 instructions for 2022-and-newer Frontiers require removal of the factory channel system. Do not remove your tracks until the exact cover instructions call for it.
Gather the Tools and Identify the Parts
Open the hardware packages and compare everything with the manual’s parts list. Identify the driver-side and passenger-side components before assembling them.
Depending on the kit, you may need:
- A socket set or combination wrenches
- A torque wrench
- A screwdriver or supplied hex or Torx key
- A tape measure
- Clean cloths and an approved surface cleaner
- Scissors for trimming supplied weather seals
Some covers also require a drill for a specified drainage opening. Do not assume a clamp-mounted cover requires no drilling anywhere; mounting and drain routing are separate parts of the installation.
For example, the UnderCover Select Frontier installation sheet lists cleaning supplies, hand tools, and a drill among its required equipment. Follow the hole location and size specified in your own manual.
How to Install a Nissan Frontier Tonneau Cover Step by Step
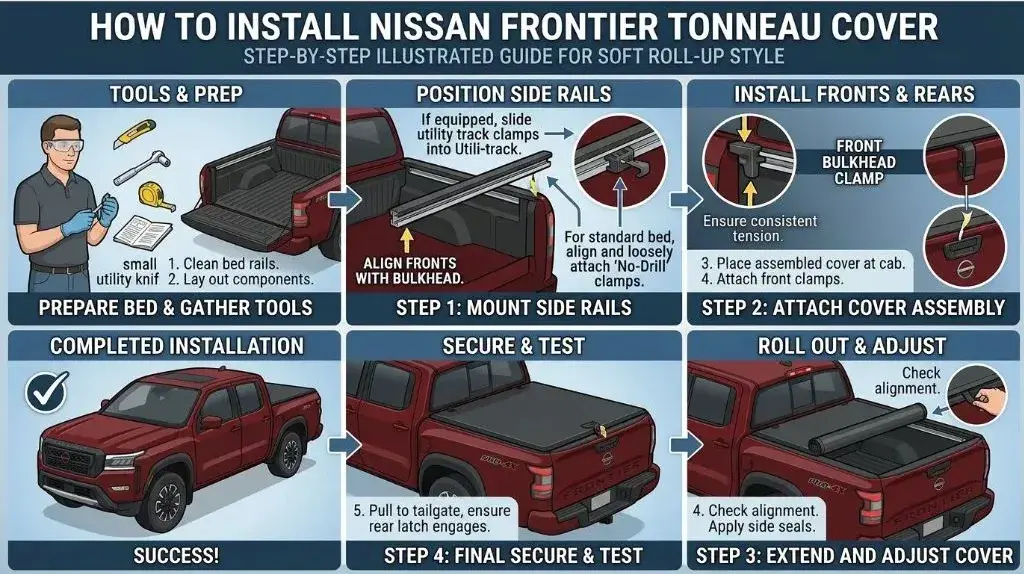
The following sequence explains the installation process. Follow your manufacturer’s assembly order wherever it differs.
1. Prepare the Truck Bed
Park on level ground, apply the parking brake, and clear the bed so you can reach the mounting points.
Clean the bed rail tops and the front bed wall behind the cab, called the bulkhead. Let the surfaces dry before attaching adhesive seals.
Check the areas underneath the bed rails as well. A bedliner edge or accessory bracket may obstruct the intended clamp position. If the supplied hardware cannot seat as shown in the manual, stop and resolve the interference before tightening it.
2. Install the Required Bulkhead Seal
If your kit includes a bulkhead seal, check whether your bedliner configuration requires it.
For the UnderCover Select Frontier application, the instructions call for cleaning and drying the bulkhead before applying the supplied adhesive strip across it. They specify that the strip is unnecessary with a drop-in bedliner. That exception applies to this cover’s installation instructions; other kits may differ.
Position the seal carefully before pressing it down. Avoid adding extra layers unless the manufacturer directs you to do so.
3. Fit the Mounting Hardware
Identify which mounting system your cover uses.
| Cover design | Installation approach |
|---|---|
| Direct-clamp folding cover | Position the cover, then secure its attached clamps to the specified bed flange or adapter brackets. |
| Separate-rail folding cover | Mount the side rails, then attach and align the folding cover assembly. |
| Roll-up cover | Follow the kit’s sequence for the side rails, front assembly, rear latch, and tension adjustment. |
| Retractable cover | Follow the specified rail-and-canister assembly order, including drainage and spacing adjustments. |
Use every required spacer, bracket, washer, and retention component. Do not substitute a convenient attachment point for the one shown in the instructions.
On the UnderCover Triad Utili-Track installation, the supplied brackets attach to slide nuts inside the factory tracks. Its instructions also provide separate tether attachments for trucks with and without Utili-Track.
4. Position and Align Separate Side Rails
Skip this step if your cover mounts directly without separate rails.
Check the rail orientation before fastening it. Match the front and rear ends to the diagrams, and position both rails at the specified height and distance from the bulkhead or tailgate.
Start the fasteners without immediately applying final torque. Check that:
- Both rails sit at matching heights.
- Neither rail tilts inward or outward.
- Clamp jaws engage the intended mounting surfaces.
- The rail spacing meets the cover’s instructions.
For the 2005–2021 UnderCover Select application, the manufacturer specifies level rails and warns that tightening too quickly or excessively can pull them downward. Its specified clamp torque is application-specific and should not be transferred to another cover.
5. Place and Secure the Cover Assembly
Get assistance when the assembly is heavy or awkward to handle.
For a separate-rail folding cover, place the folded assembly near the cab and attach its retainers as directed. Unfold it carefully toward the tailgate to check its position.
For a direct-clamp folding cover, center the assembly over the bed and fit the front and rear clamps according to the kit’s instructions.
For a retractable cover, use the manufacturer’s lifting and mounting sequence. The Retrax FRC-4000 instructions recommend two people and require the rail spacing to be checked against the canister before insertion. Do not force a binding canister or cover into place.
6. Check the Fit Before Final Tightening
Close the cover slowly and inspect its position from both sides and behind the truck.
Look for even side-to-side placement, proper front seal contact, and the specified relationship between the rear seal and tailgate.
The 2005–2021 UnderCover Select instructions direct installers to unfold the panels, check their alignment, and reposition the assembly by loosening its retainers if necessary.
Make small adjustments, then check the entire cover again. Correct the alignment before applying final torque.
7. Connect Drain Tubes, If Supplied
If your cover has drain fittings, connect the tubes and route them through the approved exits. Keep them clear of cargo and avoid pinching or sharply bending them.
The Retrax FRC-4000 instructions require drain hoses to run without kinks and provide routing details for its canister system.
Before drilling, verify the exact location, material, and hole size in your cover’s manual. An instruction to make an opening through a plastic liner is not permission to drill through the truck’s metal bed.
8. Tighten the Hardware and Test Operation
Tighten each fastener according to its specified torque or hand-tightening instruction. Different fasteners within the same kit may have different requirements.
Then operate the cover and tailgate through complete opening and closing cycles. Confirm that:
- Both sides latch securely.
- Release handles or cables work correctly.
- The tailgate clears the cover and seals.
- No clamp, bracket, or tube obstructs operation.
- All supplied safety tethers, straps, or supports are installed.
Before driving, secure the cover in a position explicitly approved by its manufacturer. For example, the UnderCover Triad instructions prohibit driving with the cover partly open and specify restraints for its folded position. They also call for checking clamp tightness after a week of driving and periodically afterward.
Troubleshooting Installation Problems
If the fit is wrong, check alignment and hardware placement before tightening anything further.
| Problem | What to check |
|---|---|
| Cover appears too short or too long | Verify the part number, bed length, and required front-to-rear position. |
| One side latches but the other does not | Check cover centering, rail height, and rail spacing. |
| Tailgate contacts the cover | Check the assembly position and the required rear seal arrangement. |
| Clamps cannot seat correctly | Confirm the Utili-Track adapters, clamp orientation, and bedliner clearance. |
| Retractable cover binds | Recheck the manufacturer’s rail spacing and alignment measurements. |
| Water collects near a drain fitting | Inspect tube connections, kinks, and the approved outlet. |
These checks help identify installation errors; they do not replace model-specific latch or rail adjustments. If the correct parts cannot be fitted as illustrated, contact the cover manufacturer before modifying the hardware or truck.
FAQs Of How to Install Nissan Frontier Tonneau Cover
Can I Install a Frontier Tonneau Cover Yourself?
A cover with clear instructions and manageable components can be a DIY installation. Arrange help for lifting large assemblies, and seek installation support if the hardware does not match the manual or the mounting points are obstructed.
Do All Nissan Frontier Tonneau Covers Use the Same Clamps?
No. The UnderCover Select and Triad instructions show different mounting arrangements, and the Triad uses additional brackets for its Utili-Track application. Use the hardware supplied for your exact cover and truck configuration.
What Should You Do if the Cover Will Not Latch?
Stop forcing it closed. Recheck fitment, centering, mounting height, and rail alignment. Make latch adjustments only according to the cover’s instructions, then verify secure engagement on both sides.
A successful Nissan Frontier tonneau cover installation starts with the correct kit and ends with secure mounting, smooth operation, and proper tailgate clearance. Resolve any binding, loose hardware, or incomplete latch engagement before driving.
Disclosure: As an Amazon Associate, I may earn from qualifying purchases at no extra cost to you. Amazon and the Amazon logo are trademarks of Amazon.com, Inc, or its affiliates.
- Amazon, Amazon Prime, the Amazon logo and Amazon Prime logo are trademarks of Amazon. com, Inc. or its affiliates.

I am Sadman, the founder of CarSensorHub.com, where I share my passion for cars and technology. I specialize in writing detailed reviews and helpful guides on car gadgets, accessories, safety tools and many more. My mission is to help car owners discover the best products and tips to improve their driving experience and stay safe on the road.