The oil pressure sensor light indicates low oil pressure, suggesting potential engine damage. When this light illuminates, it is crucial to stop immediately and check the oil level and pressure before continuing to drive.
Neglecting this warning could lead to severe engine problems, such as overheating or complete engine failure. Regular oil maintenance, including checking oil levels and pressure, is essential to ensure the smooth running and longevity of your vehicle’s engine. Additionally, timely oil changes and using the correct oil viscosity recommended by the manufacturer can prevent oil pressure issues and potential engine damage.
Be vigilant about responding to the oil pressure sensor light to avoid costly repairs or replacement of engine components.

Credit: blog.fcpeuro.com
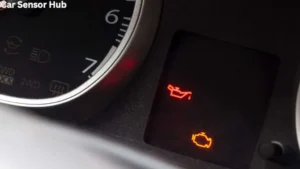
Understanding The Oil Pressure Sensor Light
The oil pressure sensor light is a crucial indicator in your vehicle that provides important information about the engine’s oil pressure. It plays a vital role in the overall health and performance of the engine, ensuring it is properly lubricated and protected.
Let’s dive deeper into the key aspects of the oil pressure sensor light:
What Is The Oil Pressure Sensor Light?
- The oil pressure sensor light is a warning light on your vehicle’s dashboard that illuminates when the engine’s oil pressure falls below the recommended threshold.
- Its purpose is to alert you of potential issues with the engine’s lubrication system, allowing you to take immediate action and prevent severe damage.
- When the light comes on, it is essential to address the situation promptly to avoid engine failure or costly repairs.
Importance Of The Oil Pressure Sensor In The Engine
- The oil pressure sensor plays a critical role in monitoring the oil pressure within the engine.
- It ensures that the engine is receiving adequate lubrication, which is necessary for reducing friction between internal components and preventing excessive wear.
- Maintaining proper oil pressure helps to cool down the engine, prevent overheating, and extend its lifespan.
- A malfunctioning or faulty oil pressure sensor can lead to inaccurate readings and potentially cause engine damage if not resolved in a timely manner.
How The Oil Pressure Sensor Light Functions
- The oil pressure sensor light is connected to a sensor that measures the oil pressure in the engine.
- If the sensor detects a drop in pressure below the recommended level, it triggers the light to illuminate on the dashboard.
- The light serves as a visual warning to the driver, indicating that immediate attention is required to prevent potential engine problems.
- As soon as you notice the oil pressure sensor light, you should pull over to a safe location, turn off the engine, and check the oil level.
- If the oil level is sufficient, you may need to consult a mechanic to diagnose and resolve any underlying issues with the oil pressure system.
The oil pressure sensor light is an essential indicator that should never be ignored. Understanding its purpose and taking appropriate action when it illuminates can help ensure the longevity and optimal performance of your vehicle’s engine. Regular maintenance, including oil changes and inspections, is also vital in keeping the oil pressure within the recommended range.
Stay attentive to the oil pressure sensor light and act promptly to protect your engine from potential damage. Do you looking for Oil Pressure Sensor Replacement Guide: Boost Your Vehicle’s Performance Now!
Causes Of Oil Pressure Sensor Light
When the oil pressure sensor light illuminates on your dashboard, it’s a signal that something is amiss with your vehicle’s oil pressure system. Ignoring this warning can lead to serious engine damage or even failure. Understanding the potential causes of the oil pressure sensor light can help you take appropriate action to prevent any further damage.
Here are some common culprits:
Low Engine Oil Level
- Low oil level is one of the most common causes of the oil pressure sensor light coming on.
- Insufficient oil in the engine can result in inadequate lubrication, causing increased friction and heat.
- Without proper lubrication, engine components can wear out quickly and cause irreversible damage.
Engine Oil Leaks
- Oil leaks can contribute to low engine oil levels and trigger the oil pressure sensor light.
- Leaks may occur due to damaged gaskets, seals, or faulty oil lines.
- Addressing oil leaks promptly is important to maintain optimal oil pressure and protect the engine from overheating.
Clogged Oil Filter
- A clogged oil filter restricts the flow of oil through the engine, potentially leading to low oil pressure and triggering the sensor light.
- Over time, debris and contaminants accumulate in the oil filter, hindering its ability to effectively filter the oil.
- Regularly replacing the oil filter during oil changes is crucial to ensure proper oil flow and prevent engine damage.
Faulty Oil Pressure Sensor
- Sometimes, the cause behind the oil pressure sensor light is simply a faulty sensor.
- An oil pressure sensor can malfunction and send incorrect signals to the dashboard, indicating low oil pressure when it’s not the case.
- Diagnosing the sensor’s functionality through proper testing can help determine if it needs replacement.
Remember, the oil pressure sensor light should never be ignored. If it illuminates, it’s essential to take immediate action to diagnose and address the underlying cause. Neglecting to do so could result in costly repairs or even the need for an entirely new engine.
Stay proactive and prioritize regular maintenance to ensure optimal oil pressure and keep your engine running smoothly.
Troubleshooting Steps For Oil Pressure Sensor Light
Oil Pressure Sensor Light: Troubleshooting Steps For Oil Pressure Sensor Light
Having the oil pressure sensor light illuminate on your dashboard can be worrisome. It indicates a potential issue with your engine’s oil pressure, which is vital for proper lubrication and protection against damage. To help you troubleshoot this problem, we have outlined the following steps:
Step 1: Check The Oil Level
Maintaining the right oil level is crucial for your engine’s performance and longevity. Here’s how to check and ensure you have the correct oil level:
- Recommended oil level range: Refer to your vehicle’s manual to identify the ideal oil level range. It typically falls between the minimum and maximum markers on the dipstick.
- How to properly check the oil level: Follow these steps to check the oil level:
- Park your vehicle on a flat surface with the engine turned off.
- Locate the dipstick, usually indicated by a brightly colored handle.
- Pull the dipstick out, wipe it clean, and reinsert it fully.
- Withdraw the dipstick again and observe the oil level. It should be within the recommended range.
Step 2: Inspect For Oil Leaks
Oil leaks can contribute to low oil pressure and trigger the sensor light. Pay attention to the following areas:
- Common areas for oil leaks:
- Oil pan gasket
- Valve cover gasket
- Oil filter
- Oil pressure sensor
- Rear main seal
- Signs of oil leaks to look out for:
- Puddles or drips of oil underneath your vehicle
- Burning oil smell
- Excessive oil consumption
- Visible oil stains on engine components
Step 3: Replace The Oil Filter
A clean oil filter ensures proper oil flow and prevents contaminants from harming the engine. Consider the following when replacing your oil filter:
- Importance of a clean oil filter:
- Filters out debris and contaminants from the oil.
- Maintains oil quality for optimal engine performance.
- Prevents premature wear and damage to engine components.
- How to replace the oil filter:
- Identify the location of your oil filter, usually near the engine block.
- Use an oil filter wrench to loosen and remove the old filter.
- Clean the filter mounting surface and apply a thin layer of oil to the new filter’s gasket.
- Install the new filter by hand, ensuring it is securely tightened.
Step 4: Test The Oil Pressure Sensor
To verify whether the oil pressure sensor is functioning correctly, perform the following tests:
- Using a pressure gauge to test sensor readings:
- Disconnect the oil pressure sensor.
- Connect a pressure gauge to the oil pressure sensor port.
- Start the engine and observe the reading on the pressure gauge.
- Compare the reading with the specifications provided by the manufacturer.
- Indications of a faulty oil pressure sensor:
- Inconsistent or erratic oil pressure readings.
- Sensor light flickering or staying constantly illuminated.
- Unusual engine noises or poor performance.
Step 5: Check The Engine Oil Pump
The engine oil pump plays a vital role in maintaining proper oil pressure. Pay attention to the following signs suggesting a malfunctioning oil pump:
- Role of the oil pump in maintaining oil pressure:
- Circulates oil throughout the engine.
- Generates the necessary pressure to deliver oil to vital engine components.
- Signs of a malfunctioning oil pump:
- Low oil pressure readings on the gauge.
- Engine ticking or knocking noises.
- Increased engine temperature or overheating.
By following these troubleshooting steps, you can identify potential issues causing your oil pressure sensor light to illuminate. Remember to consult a professional mechanic if you need further assistance in diagnosing and resolving the problem to ensure the longevity and performance of your vehicle.
Maintenance Tips To Prevent Oil Pressure Sensor Light
Regular engine oil changes:
- Regularly changing the engine oil is crucial in ensuring the proper functioning of the oil pressure sensor and preventing the oil pressure sensor light from coming on.
- Follow the manufacturer’s recommended oil change intervals to maintain optimal oil pressure in the engine.
- Make sure to use the correct grade and viscosity of oil specified by the manufacturer.
Importance of following manufacturer’s recommendations:
- The manufacturer knows the specific requirements of your vehicle’s engine and provides recommendations for oil change intervals.
- Following these recommendations ensures that the engine is properly lubricated and reduces the risk of oil pressure issues.
- Ignoring the manufacturer’s recommendations may lead to premature engine wear, which can trigger the oil pressure sensor light.
Benefits of using high-quality engine oil:
- High-quality engine oil provides better protection and lubrication for the engine components, maintaining optimal oil pressure.
- It helps to prevent friction, reduce heat buildup, and extend the lifespan of engine parts.
- Using low-quality or incorrect engine oil can result in poor lubrication, leading to increased wear and higher chances of oil pressure problems.
Inspecting for oil leaks regularly:
- Oil leaks can contribute to a drop in oil pressure, triggering the oil pressure sensor light.
- Regularly inspect the engine and surrounding areas for any signs of oil leaks, such as oil stains or puddles under the vehicle.
- Addressing oil leaks promptly can help maintain the proper oil pressure in the engine.
Visual inspection of engine components:
- Visually examining the engine components can help identify any potential issues that may affect oil pressure.
- Look for signs of damage, such as cracks or corrosion in the oil lines or oil pan.
- Ensure that all connections are secure and there are no visible signs of oil leakage.
How to identify potential oil leak sources:
- Inspect the oil filter and oil drain plug for any signs of oil leakage.
- Check the valve cover gasket, oil pan gasket, and other gaskets for any visible damage or leaks.
- Pay attention to the oil cooler lines and hoses for signs of oil seepage.
Monitoring oil pressure regularly:
- Keeping an eye on the oil pressure gauge or digital display can help detect any sudden drops in oil pressure.
- If the oil pressure drops below the normal range, it may indicate a problem in the oil system, and the sensor light may come on.
- Regularly monitoring oil pressure can help identify issues early and take necessary actions to prevent further damage.
Utilizing a diagnostic tool:
- If the oil pressure sensor light comes on, using a diagnostic tool can help identify the specific issue.
- Scan the vehicle’s computer system for error codes related to the oil pressure sensor or oil system.
- The diagnostic tool can provide valuable information for troubleshooting and resolving the problem.
Ideal oil pressure guidelines:
- Ideal oil pressure varies depending on the vehicle type and operating conditions.
- Consult your vehicle’s manual or manufacturer for the recommended oil pressure range.
- Generally, oil pressure between 30-70 psi (pounds per square inch) is considered normal for most vehicles.
- If the oil pressure falls below or exceeds the recommended range, it may indicate an issue that needs attention.
Remember, following these maintenance tips can help prevent the oil pressure sensor light from illuminating and ensure the proper functioning of the engine’s oil system. Regular inspections, oil changes, and using high-quality oil are essential for maintaining optimal oil pressure and prolonging the life of your engine.
Frequently Asked Questions Of Oil Pressure Sensor Light
What Causes The Oil Pressure Sensor Light To Come On?
The oil pressure sensor light can come on due to low oil level, a faulty oil pump, a clogged oil filter, or a malfunctioning sensor. It is important to address the issue promptly to avoid potential engine damage.
How Do You Know If Your Oil Pressure Sensor Is Bad?
If the oil pressure sensor is bad, you may notice the oil pressure light staying on even when the engine is running properly. It is recommended to have a professional inspect the sensor and replace it if necessary.
What Does It Mean When The Oil Pressure Sensor Light Flickers?
If the oil pressure sensor light flickers, it could indicate a fluctuating oil pressure, which may be caused by a failing oil pump, clogged oil passages, or low oil level. It is important to have the issue diagnosed and resolved to prevent engine damage.
Can You Drive With The Oil Pressure Sensor Light On?
Driving with the oil pressure sensor light on is not recommended, as it indicates low oil pressure or an issue with the oil system. Continuing to drive in this condition can lead to severe engine damage. It is best to pull over, check the oil level, and seek professional assistance.
How Much Does It Cost To Replace An Oil Pressure Sensor?
The cost to replace an oil pressure sensor varies depending on the make and model of your vehicle and the location of the sensor. On average, you can expect to pay between $100 and $250 for the sensor and labor costs.
It is advisable to consult a professional mechanic for an accurate estimate.
How Often Should The Oil Pressure Sensor Be Replaced?
The oil pressure sensor does not typically need to be replaced on a regular schedule. However, if you are experiencing issues with the sensor or if it is determined to be faulty, it should be replaced as soon as possible to ensure accurate readings and proper engine performance.
Finality
Ensuring the health and functionality of our vehicles is of utmost importance, and the oil pressure sensor light plays a vital role in that. This little yet powerful indicator serves as a guardian angel, alerting us to potential issues within the engine.
By monitoring the oil pressure, it provides valuable information that helps us prevent major damage and costly repairs. Understanding the significance of this warning light empowers us to take immediate action and seek professional assistance when necessary. Regular maintenance and routine checks can help keep this light at bay, ensuring the smooth running of our vehicles.
So, let’s not ignore the oil pressure sensor light but rather embrace it as a helpful companion that keeps our engines running smoothly and efficiently. Remember, it’s always better to be safe than sorry when it comes to our vehicles.
Disclosure: As an Amazon Associate, I may earn from qualifying purchases at no extra cost to you. Amazon and the Amazon logo are trademarks of Amazon.com, Inc, or its affiliates.
- Amazon, Amazon Prime, the Amazon logo and Amazon Prime logo are trademarks of Amazon. com, Inc. or its affiliates.

I am Sadman, the founder of CarSensorHub.com, where I share my passion for cars and technology. I specialize in writing detailed reviews and helpful guides on car gadgets, accessories, safety tools and many more. My mission is to help car owners discover the best products and tips to improve their driving experience and stay safe on the road.